Electric bike conversion kits are the magic wands of the cycling world, capable of turning your beloved traditional bicycle into a modern, electric-powered marvel. These kits bring the electrifying experience of an e-bike to your existing two-wheeler, offering an economical and sustainable alternative to purchasing a brand-new electric bike.

Definition and Transformation
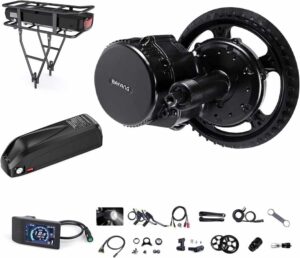
At their core, electric bike conversion kits are comprehensive sets of components that enable the transformation of a regular bike into an electric one. They typically consist of a motor, a battery, a controller, a sensor system, and various accessories. These kits take advantage of cutting-edge technology to seamlessly integrate these components onto your bike, creating a hybrid vehicle that combines the best of both worlds – the convenience of electric assistance and the familiarity of a bike you’ve been riding for years.
Variety of Conversion Kits
The world of electric bike conversion kits is as diverse as the cycling community itself. Different kits cater to varying preferences and needs. There are rear-wheel conversion kits that replace your existing rear wheel with a motorized one, offering a straightforward upgrade. Alternatively, front-wheel conversion kits fit a motorized wheel onto the front fork, providing a different riding experience. For those seeking a more balanced weight distribution, mid-drive kits replace the bike’s crankset and work in harmony with the bike’s gears. This variety ensures that you can find a kit that aligns perfectly with your bike and riding style. As we delve deeper, we will uncover the intricate mechanisms behind these kits and explore their benefits and limitations. So, let’s embark on a journey to understand the inner workings of electric bike conversion kits.
Rear Hub Motor Conversion Kits: Effortless Propulsion
Rear hub motor conversion kits are a popular choice for their simplicity and ease of installation. The motor is built into the rear wheel hub, providing a discreet and inconspicuous appearance. This type of kit is known for its straightforward setup – simply replace your existing rear wheel with the motor-equipped wheel, attach the battery, and you’re ready to go. Rear hub motors offer a balanced ride and are well-suited for flat terrains and city commuting. However, they may impact the balance of your bike, especially if you frequently carry heavy loads.

Front Hub Motor Conversion Kits: Smooth Acceleration
Front hub motor conversion kits share similarities with their rear counterparts but are designed for the front wheel. This type of kit provides smooth acceleration and maintains the bike’s balance, making it a great choice for those who prioritize a natural feel while riding. Front hub motors excel on paved roads and moderate terrains, offering a comfortable and stable experience. However, they might cause slight instability on loose or slippery surfaces, as the motor’s force can potentially affect steering.
Mid-Drive (Bottom Bracket) Conversion Kits: Harnessing the Gears
Mid-drive conversion kits, also known as bottom bracket kits, are the performance powerhouses of the conversion world. Instead of driving the wheel directly, these motors are positioned at the bike’s bottom bracket, engaging with the bike’s gears. This means they can leverage the bike’s existing drivetrain, resulting in efficient power utilization and better performance on steep hills or challenging terrains. Mid-drive kits offer a more natural riding experience as they respond to your pedaling cadence and gear shifts. However, they tend to be more complex to install and might require adjustments to your bike’s existing components.
Choosing the Right Kit for You
Each type of conversion kit has its own strengths and considerations. Rear hub motor kits are user-friendly and offer a discreet appearance, front hub motor kits provide smooth acceleration and balanced rides, and mid-drive kits deliver impressive power and versatility. When deciding which kit suits you best, consider factors such as your riding preferences, the terrain you’ll be covering, and your familiarity with bike mechanics. With the right kit in hand, your journey to an electrified bike adventure is within reach. In the following sections, we’ll take a closer look at the conversion process and the pros and cons of each kit type.
-
Gather Your Tools: Before you dive into the installation, make sure you have the necessary tools on hand. Commonly required tools include wrenches, screwdrivers, and pliers.

-
Remove the Wheel: If you’re opting for a rear or front hub motor conversion kit, you’ll start by removing the existing wheel. This usually involves loosening the nuts or quick-release lever, disconnecting the brake, and sliding the wheel out of its dropouts.
-
Install the New Wheel: Replace the original wheel with the one equipped with the motor. Ensure that the motor’s power cable is properly routed and secured.
-
Attach the Motor: If you’re using a mid-drive kit, the next step is to attach the motor to the bottom bracket area. This might require removing the existing bottom bracket and replacing it with the one provided in the kit.
-
Mount the Battery: Install the battery on your bike’s frame or a designated mounting point. Make sure it’s securely fastened and positioned to maintain balance while riding.
-
Connect Wiring and Components: Connect the various electrical components, including the motor, battery, controller, and display unit. Follow the manufacturer’s instructions carefully to ensure correct wiring and connections.
-
Test and Adjust: Before you hit the road, test the kit to ensure that all components are functioning properly. Check the motor’s engagement, throttle response, and any additional features provided by the kit.
Prioritize Professional Installation for Safety and Performance
While many conversion kits come with detailed installation guides, it’s essential to acknowledge that the installation process can be intricate, especially if you’re new to bike mechanics. Incorrect installation can lead to suboptimal performance, safety risks, and even damage to your bike or the kit components. If you’re not confident in your mechanical skills, seeking the assistance of a professional bike mechanic or a shop specializing in e-bikes is a wise choice. Their expertise ensures that your conversion is seamless, safe, and optimized for maximum performance.
In the following sections, we’ll explore the nuances of electric bike conversion further, including the various components involved and the specific advantages and challenges of each kit type. Whether you’re an avid cyclist or a newcomer to the world of biking, electric bike conversion kits offer a gateway to a thrilling and eco-friendly ride.
When it comes to e-bike conversion kits, the market offers a diverse array of options, each catering to different preferences, needs, and budgets. Here, we’ll delve into the various kit options available, ensuring that you can make an informed decision that aligns with your riding style and goals.
-
Power Levels and Features: Conversion kits come with varying levels of power, often denoted in watts (W). Kits with higher power output generally offer enhanced acceleration and better performance on steep inclines. Additionally, some kits provide features like multiple assist modes, regenerative braking, and even wireless connectivity to a smartphone app for monitoring and customization.
-
Wheel Size Compatibility: Electric bike conversion kits are designed to accommodate different wheel sizes, ranging from the standard 26-inch wheels to larger 700c road bike wheels or smaller wheels found on folding bikes. Before purchasing a kit, ensure that it’s compatible with the wheel size of your existing bike.
-
Bike Type Specific Kits: Depending on your bike’s type, such as road, mountain, folding, or hybrid, you’ll find kits designed to cater to specific needs. For example, folding bikes might require compact and lightweight components, while high-end mountain bikes could benefit from powerful mid-drive kits optimized for off-road terrain.
-
Budget Considerations: Conversion kits vary in price, allowing you to choose one that fits your budget. While some high-end kits might offer advanced features and top-tier components, more affordable options still provide a solid e-bike experience without breaking the bank.
Customizing Your E-Bike Transformation
The availability of these diverse kit options ensures that you can  customize your e-bike transformation according to your preferences and riding requirements. Whether you’re seeking an extra boost for your daily commute, aiming to conquer steep hills effortlessly, or exploring off-road adventures, there’s a conversion kit that suits your aspirations.
As we move forward, we’ll explore the critical components that make up an e-bike conversion kit. Understanding the role of these components in powering your ride will help you make an informed decision about the kit that best suits your needs. Let’s embark on a journey through the heart of e-bike conversion technology.
1. Electric Motor Assistance:
At the heart of every conversion kit lies the electric motor. This motor is responsible for providing the extra power that propels your bike forward. Depending on the type of kit, the motor can be mounted on the front or rear wheel (hub motor) or integrated near the bike’s bottom bracket (mid-drive). When you pedal, the motor engages to provide varying levels of assistance, making your rides smoother and less strenuous.
2. Torque and Cadence Sensors:
To ensure seamless assistance, conversion kits often incorporate torque sensors and cadence sensors. Torque sensors measure the force you apply to the pedals, allowing the motor to provide proportional assistance. Cadence sensors monitor your pedaling speed and adjust the motor’s output accordingly. These sensors work in tandem to create a natural and responsive riding experience, where the motor assistance feels like a seamless extension of your own effort.
3. The Role of the Controller:
Conversion kits also come with a controller, which acts as the brain of the system. This device receives signals from the sensors and processes them to regulate the motor’s power output. Through the controller, you can switch between different assist levels and even turn off the motor when you prefer to ride solely on your own strength. Some advanced controllers also offer additional features like regenerative braking, where the motor acts as a generator to recharge the battery when braking.
4. Battery Power:
Of course, all this electric power requires a source, and that’s where the battery comes in. The battery stores and supplies the energy needed to drive the motor. The capacity of the battery, measured in watt-hours (Wh), determines how far you can ride on a single charge. The battery is usually mounted on the frame, either inside a custom casing or attached to a rack.

Understanding the inner workings of these components helps you appreciate how a conversion kit turns your conventional bike into an electrified marvel. As we continue our journey through the world of electric bike conversion, we’ll explore the installation process in detail. Installing a conversion kit correctly is crucial for a safe and optimal riding experience. Let’s unravel the steps to bring your e-bike to life.
1. Define Your Riding Needs:
Before delving into the plethora of conversion kit options, take a moment to define your riding needs and expectations. Are you looking for a powerful motor to tackle steep hills? Do you prefer a subtle electric assist for longer rides? Understanding your riding style and goals will guide you in choosing a kit that aligns perfectly with your preferences.
2. Assess Your Bike:
Take a thorough inventory of your current bike’s specifications. Consider its wheel size, frame type, brake system, and drivetrain. These factors will play a significant role in determining the compatibility of the conversion kit with your bike. Ensuring a seamless fit will result in a smoother installation process and a better riding experience.
3. Power and Range:
Different kits offer varying levels of power and range. Consider the type of terrain you’ll be riding on and how much assistance you need. If you frequently encounter steep hills or cover longer distances, opting for a kit with higher power and extended range might be ideal.
4. Battery Placement:
Conversion kits offer different battery placement options, such as downtube-mounted or rear rack-mounted batteries. The choice depends on your aesthetic preferences and the impact on your bike’s balance. Additionally, consider the ease of removing and charging the battery.
5. Compatibility with Riding Style:
Conversion kits can provide either pedal-assist or throttle-controlled electric assistance. Pedal-assist mode engages the motor when you pedal, while throttle mode provides on-demand power. Choose a kit that complements your preferred riding style and enhances your overall experience.
6. Research and Compare:
Invest time in researching different conversion kits available in the market. Compare their specifications, customer reviews, and warranty offerings. Look for kits from reputable manufacturers known for quality and customer support. Online forums and communities can provide valuable insights from fellow e-bike enthusiasts.
7. Budget Considerations:
Conversion kit prices can vary significantly based on power, features, and brand. Set a budget range and explore kits within that range. While it’s tempting to opt for the most powerful kit, remember that the kit’s features should align with your riding needs and expectations.
8. Seek Expert Advice:
If you’re uncertain about which kit to choose or whether a specific kit is compatible with your bike, don’t hesitate to seek advice from bike mechanics, e-bike enthusiasts, or the kit manufacturer’s customer support. Their expertise can help you make an informed decision.
Conclusion:
Choosing the right electric bike conversion kit is an exciting step toward enhancing your cycling experience. By assessing your riding needs, understanding your bike’s specifications, and researching different options, you’ll be well-prepared to embark on your electrification journey. In the upcoming sections, we’ll guide you through the installation process, ensuring that your chosen conversion kit seamlessly transforms your bike into a dynamic and electrified companion.

As you conclude this journey into the world of electric bike conversion kits, you’ve gained insight into the mechanics, components, and transformative potential of these kits. Electric bike conversion kits hold the key to turning your conventional bicycle into a dynamic electric-powered vehicle, expanding the boundaries of your cycling adventures.
By choosing the right kit, understanding its components, and following installation guidelines, you have the power to unlock a new realm of possibilities. From revitalizing your old bike to embracing eco-friendly transportation and conquering challenging terrains with ease, the benefits of conversion kits are as diverse as the paths you can explore.
With a converted electric bike, you not only extend the life of your beloved bicycle but also tap into the exciting world of electric mobility. As you embark on your electrified journey, remember that every twist of the throttle or turn of the pedal brings you closer to unique riding experiences and a future where your bike’s potential knows no bounds.
So, whether you’re seeking the thrill of a fast ride or the convenience of effortless commuting, an electric bike conversion kit empowers you to customize your cycling adventure like never before. Unleash the electric possibilities, embrace innovation, and let your transformed e-bike propel you toward exciting horizons.
In our next series of articles, we’ll delve deeper into specific aspects of electric bike conversion, from choosing the right kit for your needs to installing it step by step. Stay tuned for more electrifying knowledge and join the movement toward a greener, more exhilarating way of riding.
Embrace the electric revolution, and let the road be your canvas.